There is an increasing tendency for our children to think of electronics as an incomprehensible mass that just does what we want (or not) when we push buttons. This activity introduces children to the most significant circuit in modern digital processing. An adder is a circuit that is used any time addition is performed in a computer processor.
A full adder is a logical circuit that takes two bits of input plus an optional carry bit and uses them to perform binary addition. In modern electronics we use wire configurations and transistors in order to perform logical AND and OR operations, but these functions have also been demonstrated with Tinkertoys, dominoes, water pipes, and pressure valves.
In this exercise we are going to create that circuit by teaching students basic behaviors that can be remembered and repeated by children as young as three, although the requirement to sit still and do it on cue requires a slightly older age group. All that is required is that the child be able to touch the shoulder of the person sitting in front of them (or not) based on how many people are touching their shoulders.
There are four logical operators that have to be simulated in order to create a full adder: Split, Or, And, and Xor.
| Any shoulder touched | n | y |
|---|---|---|
| Touch 2 shoulders | N | Y |
A splitter is the simplest role. All a splitter has to do is touch two shoulders if someone touches their shoulder. These are not really logic gates, but a requirement based on the limited number of hands a person has, and the limit of their reach. It also simplifies the roles, so that you don't have some AND gates touching one shoulder and other AND gates touching two shoulders.
In a computer, this function is performed by having the wire split into two wires on its way into the circuit.
| Left | |||
|---|---|---|---|
| n | y | ||
| Right | n | N | Y |
| y | Y | Y | |
An OR is the next simplest role. Someone who plays an OR gate will touch a shoulder in front of them if their left OR right shoulder is being touched.
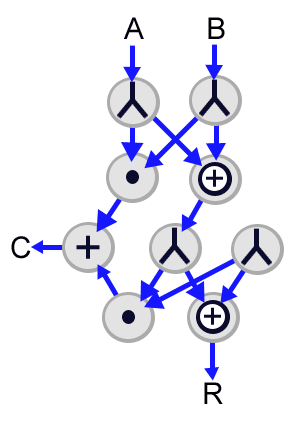
An OR gate is similar to addition. In binary addition, you can add the two 1's together to get the same result as an OR gate, assuming you accept that 2 is logically identical to 1. Because of this, a plus (+) sign is generally used to represent an OR gate.
| Left | |||
|---|---|---|---|
| n | y | ||
| Right | n | N | N |
| y | N | Y | |
An AND gate is slightly more complex than an OR. Someone who plays an AND gate has to touch the next person's shoulder if they have people touching their left AND their right shoulders, and no less. One touch is not enough to “activate” an AND gate.
An AND gate is similar to multiplication. In binary addition, you can multiply the two 1's or 0's together to get the same result as you would for an AND gate. Because of this, a multiplier dot (·) sign is generally used to represent an AND gate.
| Left | |||
|---|---|---|---|
| n | y | ||
| Right | n | N | Y |
| y | Y | N | |
An XOR gate (called an exclusive or gate) is similar to an OR gate in that they will touch the next person's shoulder if their left or right shoulder is being touched. It is different in that they will not touch the next person's shoulder if both shoulders are being touched.
The logical symbol for XOR gate is a plus sign with a circle around it (⊕).
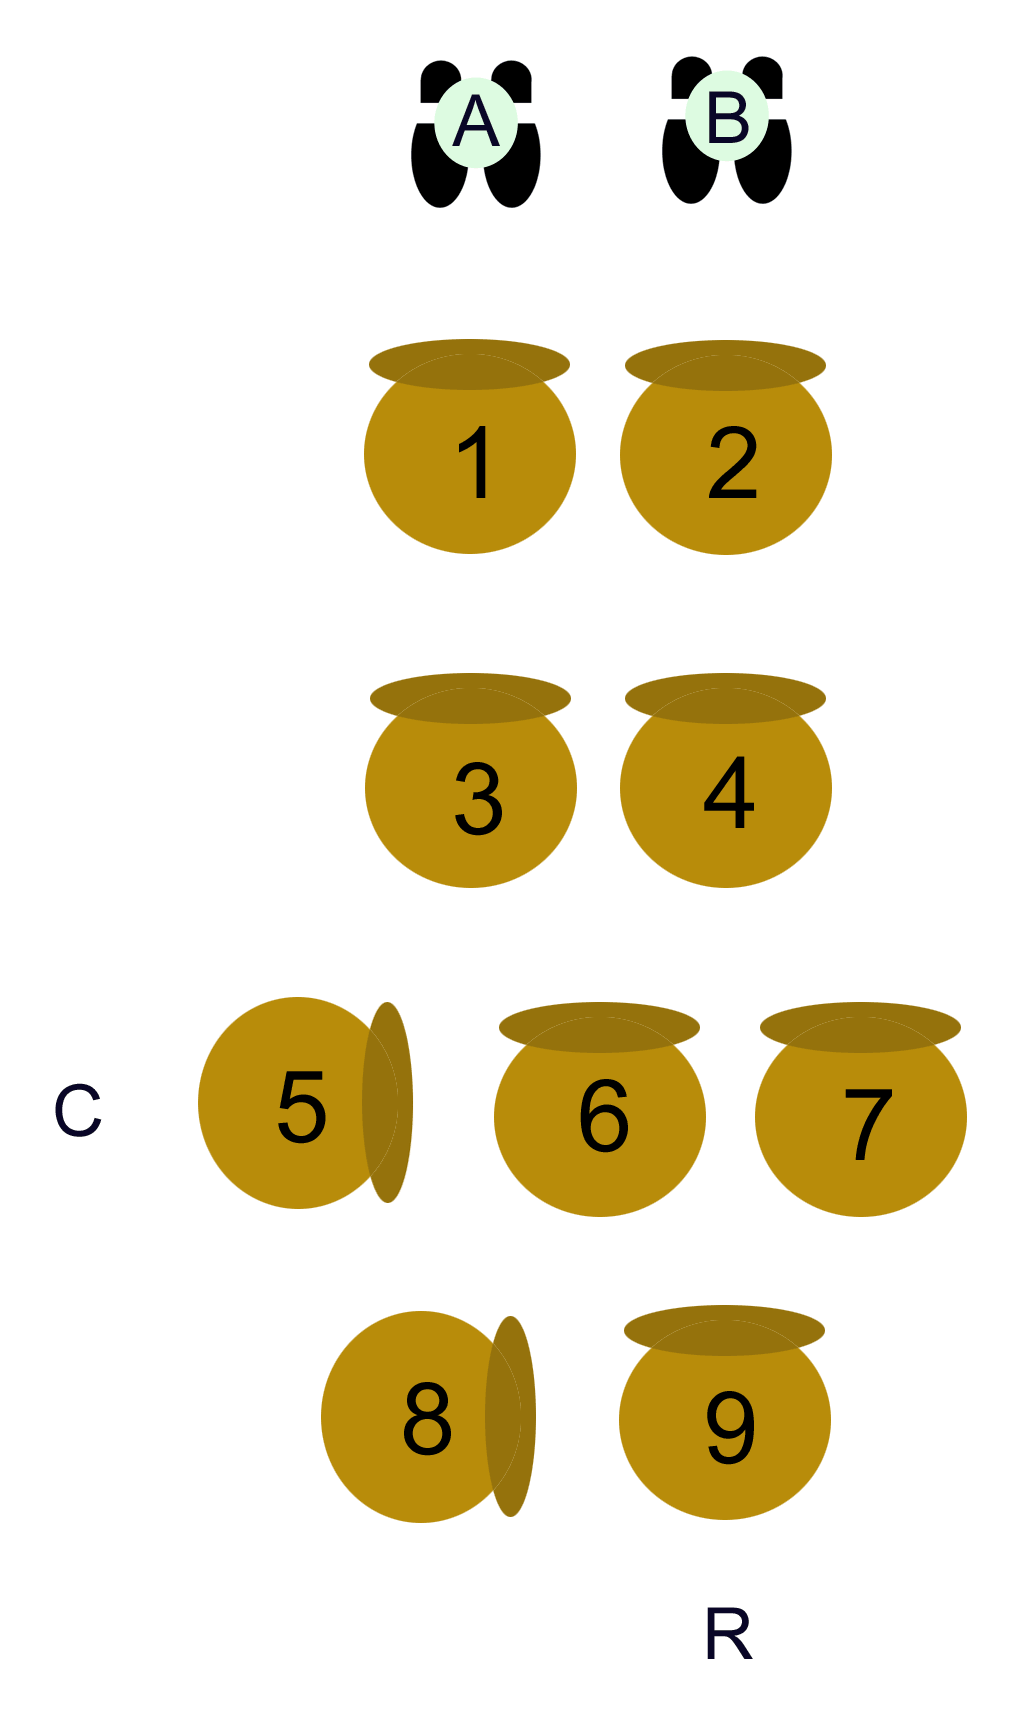 |
In order to build a full adder, chairs should be arranged as in figure 1. A and B are where the people who will give input to the circuit will stand. C is where the carry bit will be produced, and R is where the result bit will be produced. Either the chairs will have to be close enough that the children can touch the shoulder of the people in front of them without leaning forward, or some form of baton can be used to extend the child's reach. |
|
|
Children trained for their role (see the next section) should then take the seats as described in figure 2. |
 |
|
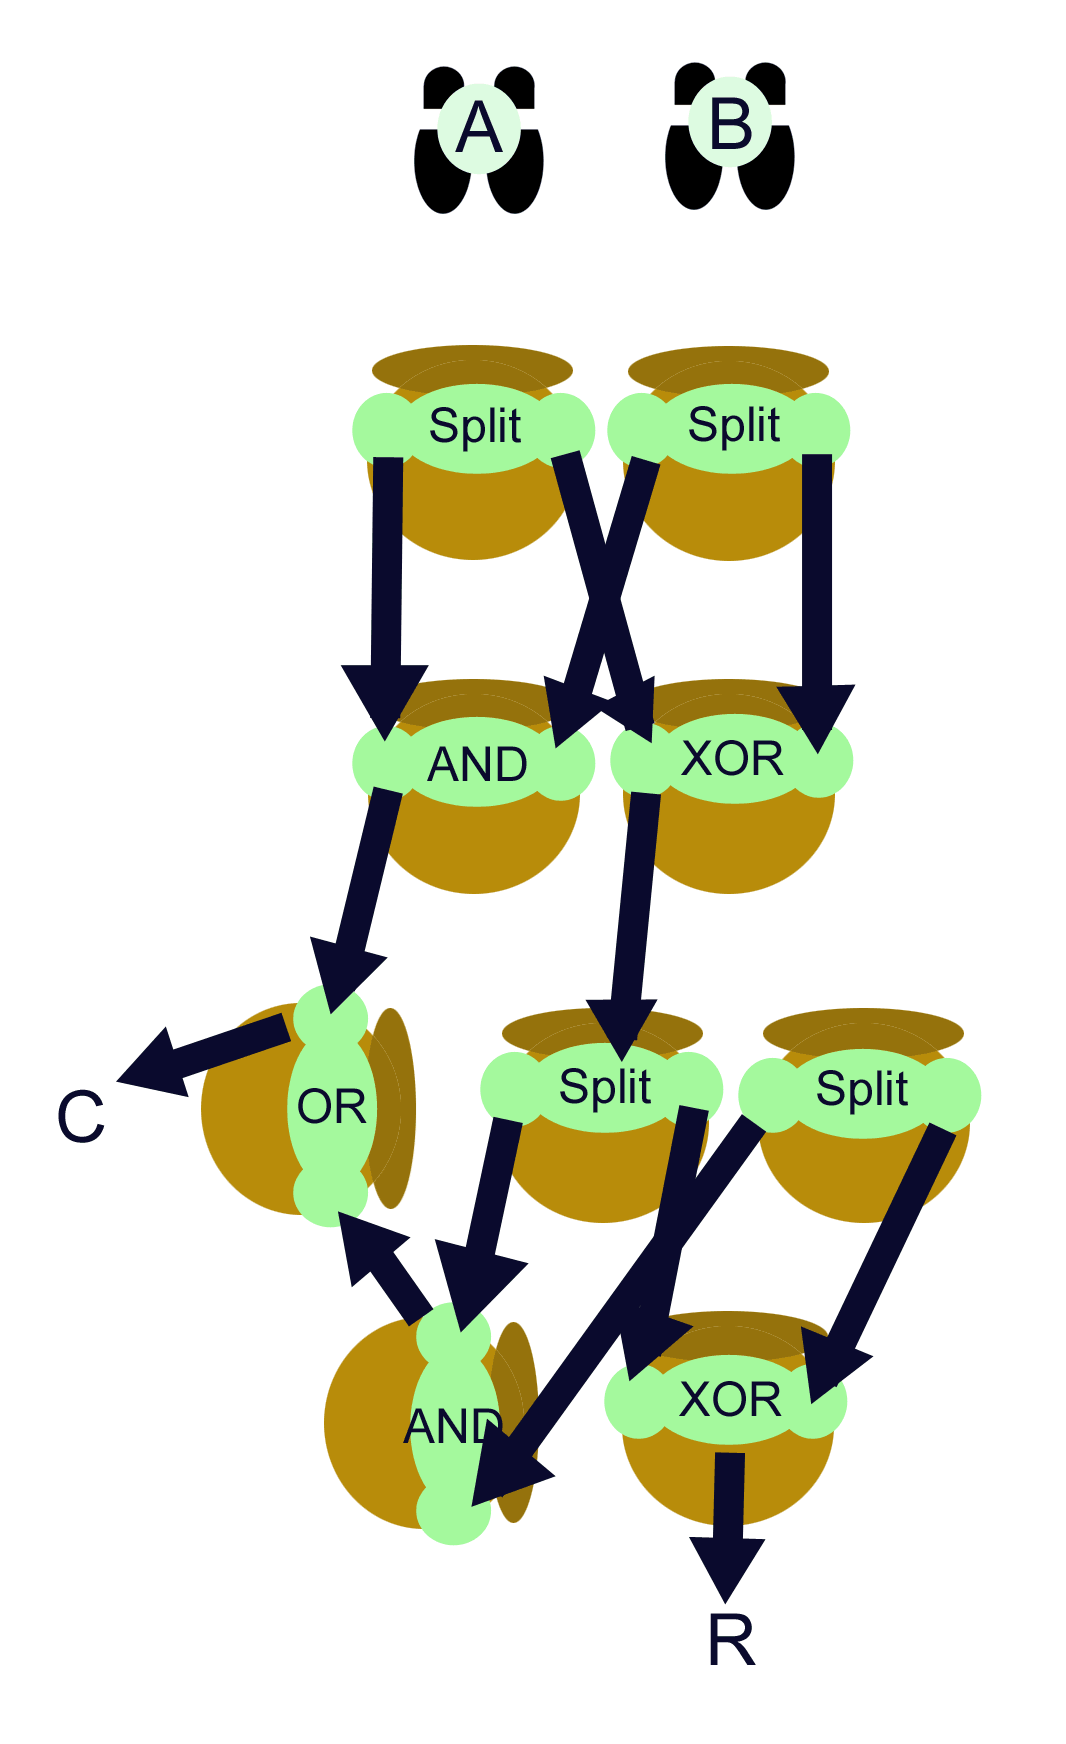 |
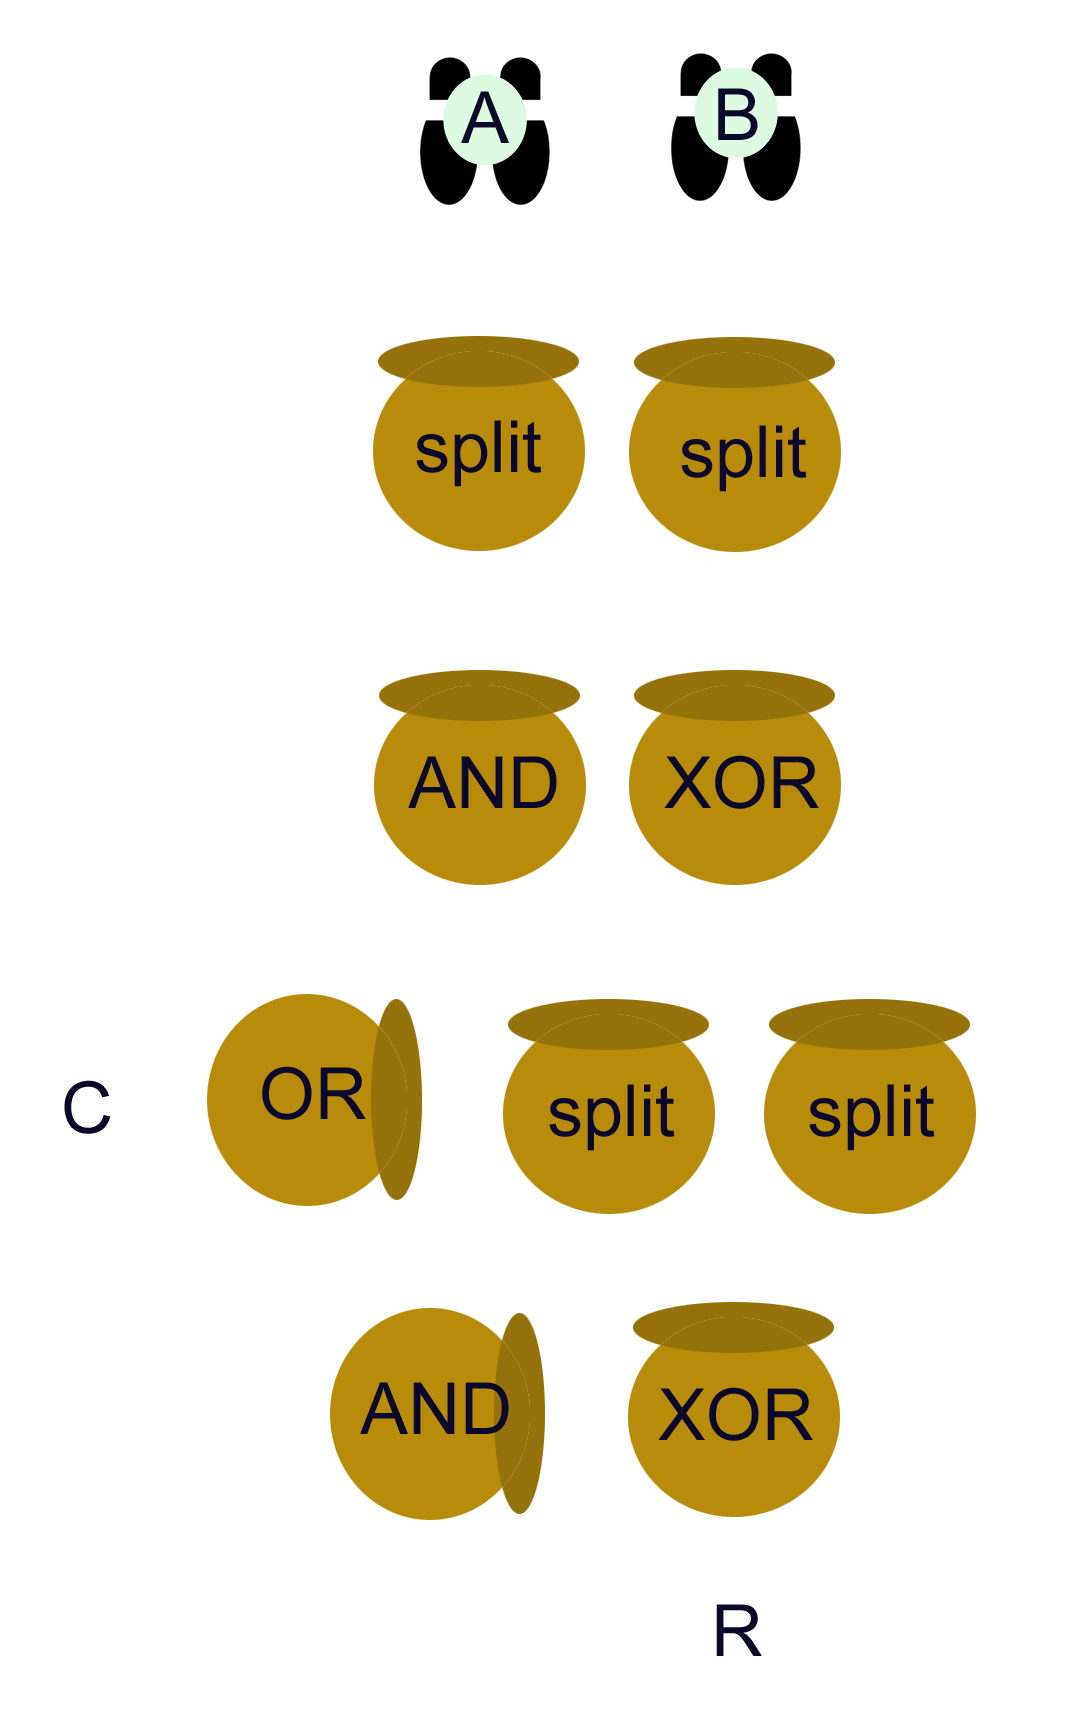
Each child has a fixed number of shoulders that they are to touch. Splitters are to touch two, all other roles are to touch one. In order to create the circuit, here is which shoulder each child should be instructed is the target of their touch. If we stop trying to draw this as if we were drawing children sitting in chairs, it produces the logic diagram on the right. This is a much clearer way of communicating what is actually happening. |
|
These are the inputs and outputs for the circuit. The top two nodes are the inputs for the two bits that are to be added together by this adder. If a bit is one, then the input person touches the splitter's shoulder. If the bit is zero then the input person does not touch the splitter's shoulder.
The XOR node at the bottom produces the result (R) for the addition performed by this bit, and the OR node produces the carry bit (C) for this circuit. If both input bits are 1's the result is binary "10" (there are 10 kinds of people in the world, those that understand binary and those that don't). The result for this bit is 0, and the 1 carries over to the next adder.
The splitter on the far left is where the carry bit is received from the previous adder. This means that multiple adders can be lined up as follows to perform multi-bit addition.
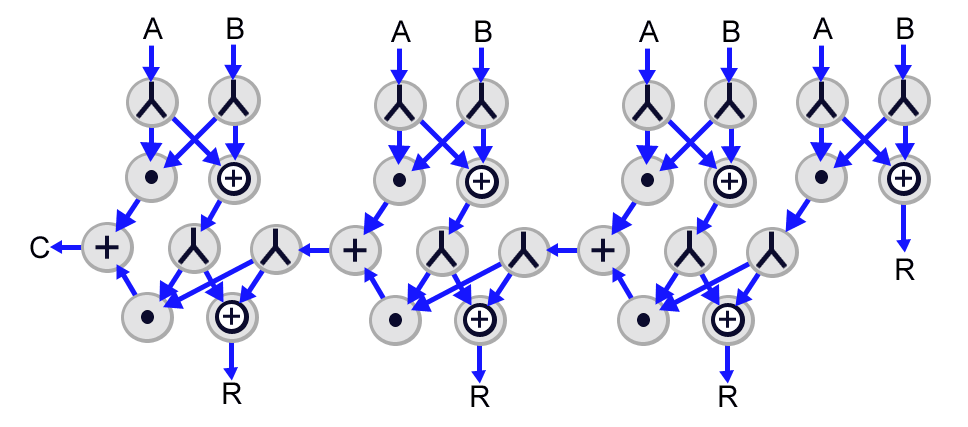
The entire bottom half of the circuit exists solely to add in the carry bit from the previous adder. You may notice that the far right splitter will never have an input on the first adder. Because of that, the bottom AND will always result in zero, and the OR will always take on the value of the upper AND. Similarly, the bottom XOR will always just pass through the value from the upper XOR.
This makes the bottom five elements on the first adder useless. You can pass the top AND's result straight to the carry bit splitter on the next adder, and you can take the result of the top XOR as that adder's result. It is common when designing computers to not have the bottom half of the adder on the first adder because it's just one more component to break.
In the case of this exercise, using a half-adder instead of a full adder for the first bit saves us five positions and rescues those participants from terminal boredom.
For this exercise to be meaningful to an observer it needs to have visual input and output. For this exercise, we are going to use 81/2 x 11 pieces of cardboard as signs for each of the input and output positions, plus one for the final carry bit position.
The left-hand inputs for all adders will combine to be a single binary number that is the first addend, and the right hand inputs combine to be the second addend. To make this clear, the signs for the left-hand inputs will be a different color than those of the right hand. We will be arbitrarily using black-on-white and white-on-black. Holding the left-hand inputs above the right hand inputs will also provide visual benefit. For clarity, the output signs will be blue-on-white.
In a decimal number, each decimal place is raised to the power of ten, so the first one is the 1's, the second is the 10's, etc. In binary, each place is raised to the power of two, the first being 1, the second is 2, the third is 4, the fourth is 8. With four adders, the carry bit would have a value of 16.
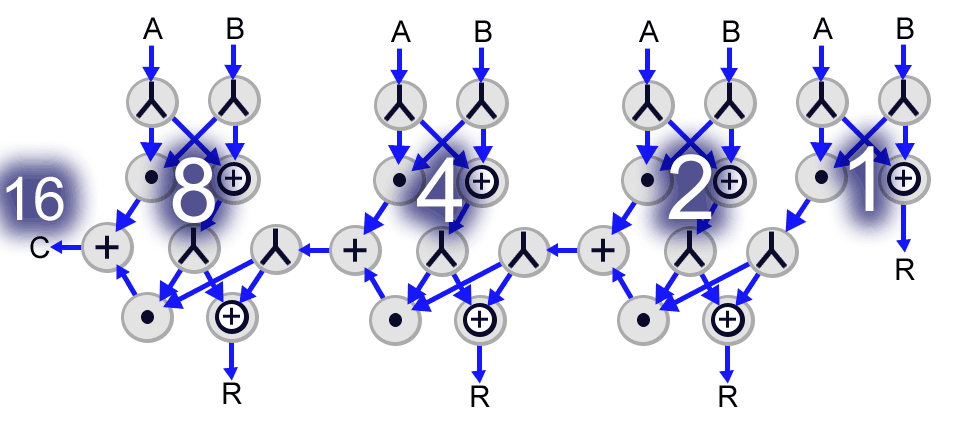
To improve the obviousness of this, the signs will have the numeric value of the bit on one side and a 0 printed on the other. When results are examined, the values displayed on the cards will just need to be added together, like so:
| Place | carry | 8 | 4 | 2 | 1 | result | |||||
|---|---|---|---|---|---|---|---|---|---|---|---|
| A | 0 | + | 4 | + | 2 | + | 1 | = | 7 | ||
| B | 8 | + | 0 | + | 2 | + | 0 | = | 10 | ||
| R | 16 | + | 0 | + | 0 | + | 0 | + | 1 | = | 17 |
For extra credit, feel free to trace through the logic to verify this result yourself.
Each child in a circuit has a logical function. By videotaping the action from in front and above, it should be fairly easy to see what a child does. It can be a little harder to tell what they're supposed to do. Having each child wear a mortar-board style hat with an indicator of their function will provide a learning tool to help understand exactly how the circuit works.
Propogation occurs when a message is passed through multiple nodes. The propogation speed of the bits on a Kidputer is based on the reaction and movement speed of the children who are acting as the logic gates. They have to realize that their shoulder has been touched, perform the appropriate logic, and then reach out and touch the person in front of them. This generally takes a couple of seconds per student.
The propogation exercise teaches two important things. First, that all of the other kids are waiting for you to get your hand up there and touch that shoulder. Second, that you may have to wait a bit for a change to actually reach your shoulder, so their attention is less likely to drift while waiting for it to happen.
A propogation exercise is very simple. It involves lining all participants in single file in an s-curve. Each child should be facing the next child's back. The instructor would then touch the shoulder of the child furthest back in the line. Every child, when they feel their shoulder touched, would then touch the person in front of them.
When the child at the front of the line finally gets the signal, they should announce the fact. If a bell is availble, then ringing the bell would also work. This should be repeated a number of times until the children can all competently touch the person in front of them within a couple of seconds, and then everyone should turn around and the exercise is repeated in reverse.
By timing the propogation from the front of the line to the end, the teacher can estimate how long each calculation is going to take to perform on the final circuits.
To avoid confusion it is recommended that children be trained for their role and only their role. Break the children into four groups by role and teach them individually what they will be doing, and how they will be expected to react. Let them know that they'll be told about what the other roles are after the exercise.
This exercise creates a hands-on learning tool where children can learn digital math and the value of cooperation. It provides the students with a foundation for understanding how computers are capable of doing the things that they do. It incorporates visual, kinesthetic and cognitive learning components.